
The Ideal Beginner’s Guide to the Meta Ads Manager
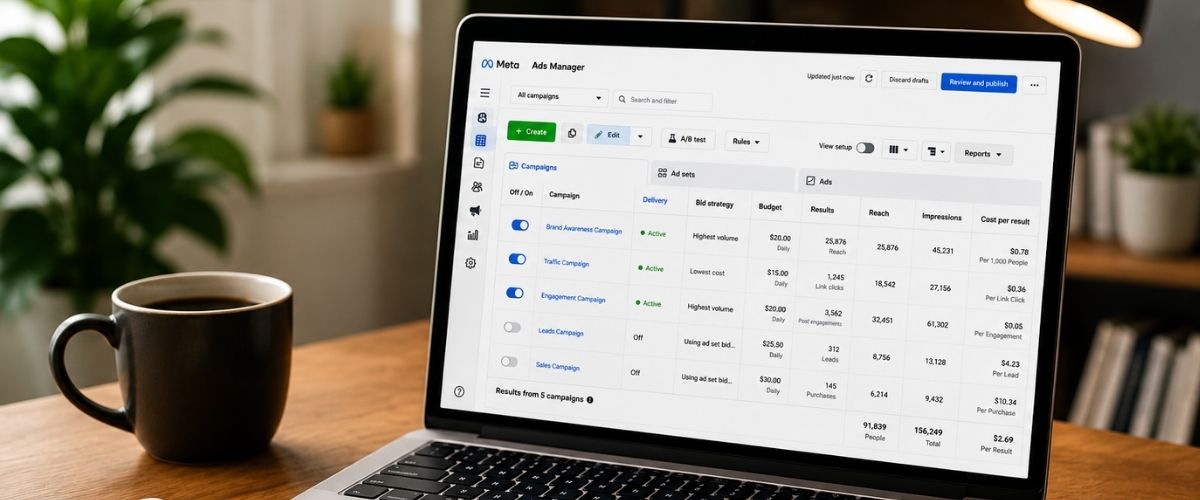
Meta Ads Manager is where all your Facebook and Instagram ad campaigns actually live. It's the platform you use to build ads, pick your audience, set a budget, and track how everything is performing. If you've been boosting posts from your phone, this is a completely different experience. It gives you a lot more control over where your money goes and who sees your ads.
A lot of people open it for the first time and feel a bit lost. That's pretty normal. There are a lot of sections and menus and numbers on screen. But once you understand how the structure works, it clicks fairly quickly. This guide goes through each part so you know what you're looking at before you spend a cent.
What Is Meta Ads Manager?
Meta Ads Manager is the tool Meta (the company behind Facebook and Instagram) built for running paid ads. It replaced the older Facebook Ads Manager name a few years back when the company rebranded. You still use it to run ads on Facebook, Instagram, Messenger, and the Audience Network.
It's free to access. You just need a Facebook account, a Business Manager account, and a Page for your business. From there, you go to ads.facebook.com and you're in. The dashboard is where everything happens, from setting up your first campaign to checking results a few weeks in.
The Three-Level Campaign Structure
This is the most important thing to understand before you do anything else. Meta organises ads in three levels. If you skip this, the platform will feel confusing.
- Campaign: Sets the overall objective of your ads (such as traffic, leads, sales, awareness, or conversions).
- Ad Set: Controls who sees the ad, along with audience targeting, budget, schedule, and placements.
- Ad: Contains the actual creative elements users see, including images, videos, copy/text, headlines, and links.
Every campaign has at least one ad set. Every ad set has at least one ad. You can have multiple ad sets inside a campaign, and multiple ads inside each ad set. Most beginners start with one of each just to keep things simple
Step 1: Choosing Your Campaign Objective
When you create a new campaign, the first thing Meta asks is what you want to achieve. This is your objective. It tells Meta's algorithm what kind of people to show your ad to.
These are the main objectives you'll see:
- Awareness - show your ad to as many people as possible within your audience
- Traffic - send people to your website or landing page
- Engagement - get more likes, comments, messages, or video views
- Leads - collect contact details through a lead form or your website
- App Promotion - get installs or in-app actions
- Sales - find people likely to buy
For most service businesses just starting out, Traffic or Leads is a good place to begin. Traffic works well when you already have a landing page set up. Leads can be faster if you want people to fill out a form without leaving Facebook.
Pick the objective that matches what you actually want to happen. If you choose Awareness but you really need phone calls, the results won't reflect that.
Step 2: Setting Up Your Ad Set
The ad set level is where beginners usually spend the most time. This is where you control who sees your ad and how much you spend.
Budget and Schedule
You can run ads with a daily budget or a lifetime budget.
- Daily budget means Meta will try to spend roughly that amount each day. You can turn it on and off whenever you want.
- Lifetime budget means you set a total spend for the whole campaign and Meta distributes it across the days you choose.
For beginners, a daily budget is easier to manage. Start small. $10 to $20 a day is enough to get real data while you're learning. You can increase later once you see what's working.
Audience Targeting
This is one of the biggest differences between boosting a post and using Ads Manager properly. You get real control over who sees your ad.
The main targeting options are:
- Location: target by country, state, city, or even a radius around a specific address
- Age and gender: filter to the age groups most relevant to your product or service
- Detailed targeting: add interests, behaviours, job titles, and more
- Custom Audiences: upload a customer list or retarget people who visited your website
- Lookalike Audiences: find new people who are similar to your existing customers
Most beginners use detailed targeting to start. Pick interests that match what your customer cares about. Avoid making the audience too narrow early on. A size of 500,000 to 2 million people is a reasonable starting range for most Australian businesses running Facebook ads.
Placements
Meta defaults to "Advantage+ placements" which lets the algorithm decide where to show your ad across Facebook, Instagram, Messenger, and Audience Network. For beginners, this is fine to leave on. As you get more comfortable, you can manually choose placements and test what performs best for your audience.
Step 3: Creating Your Ad
The ad level is where you put together what people actually see. You'll choose your format first.
Ad Formats
- Single Image: Best for simple, direct messaging with one strong visual.
- Video: Best for showing a process, product demo, or telling a story.
- Carousel: Best for displaying multiple images or videos in one ad that users can scroll through.
- Collection: Best for showcasing product catalogues with a cover image or video.
- Instant Experience: Best for creating full-screen mobile ads that load quickly and provide an immersive experience.
For beginners, single image or short video ads are the easiest to start with. Keep the visual clean and get to the point within the first two seconds for video.
Ad Copy
Your ad copy sits around the visual. Meta breaks it into a few fields:
- Primary text - the main body of text that appears above the image
- Headline - bold text below the image
- Description - smaller supporting text (not always shown depending on placement)
- Call to action button - the button people click (Learn More, Get Quote, Sign Up, etc.)
Short primary text works well in most cases. Tell people what you're offering and why it matters to them. You don't need to tell the whole story in the ad. The ad's job is to get the click, not close the sale.
Key Metrics to Track in Meta Ads Manager
Once your campaign is live, Ads Manager shows you a dashboard with performance data. These are the numbers that matter most when you're starting out:
- Reach: how many individual people saw your ad
- Impressions: total number of times your ad was displayed (can be higher than reach if the same person saw it more than once)
- CPM (Cost Per 1,000 Impressions): what you're paying to get your ad in front of people
- CTR (Click-Through Rate): percentage of people who clicked your ad after seeing it
- CPC (Cost Per Click): how much each click is costing you
- Conversions - the actions taken on your website (requires the Meta Pixel to be installed)
- Cost Per Lead or Cost Per Result: how much each lead or desired outcome is costing you
For most cold audience campaigns, a CTR between 1% and 3% is pretty normal. Below 0.5% usually means the ad creative or targeting needs work. CPM varies a lot by industry and season, so don't compare your numbers directly to someone in a different business.
Common Mistakes Beginners Make
Most early mistakes happen when people move too fast before they have enough data.
- Turning ads off too early: Meta's algorithm needs at least 50 conversions in a week to fully optimise. Pausing after two days with no results doesn't give it enough time.
- Too many changes at once: every time you edit an ad set, Meta resets the learning phase. Change one thing at a time and wait a few days before deciding.
- Weak creative: even strong targeting won't save a bad ad. The image or video is the first thing people see.
- No Pixel installed: running conversion campaigns without the Pixel means Meta has no signal to improve targeting over time.
- Budget too spread out: splitting $20 a day across five different ad sets means each one gets $4, which is not enough data for any of them to perform.
How Ads Manager Connects to Your Broader Marketing
Ads Manager is one part of a bigger setup. It works best when the pages and follow-up process around it are also solid. That means having a landing page that matches what your ad promises, and some kind of follow-up once people do click through.
Businesses that do well with paid social usually have these pieces in place. The ad brings the traffic. The landing page turns visitors into leads. The follow-up turns leads into clients. Getting across Ads Manager is the first step, but it sits inside a wider picture that includes your offer, your page, and your sales process. Understanding how it all connects is part of what good digital marketing management looks like in practice.
Meta Ads Manager vs Boosting Posts
A lot of business owners start by boosting posts from their Facebook Page. It's fast and simple. But it has real limits compared to using Ads Manager properly.
- Audience Targeting Detail: Boost Post offers basic audience targeting, while Ads Manager gives you full control over who sees your ads.
- Objective Options: Boost Post provides limited campaign objectives, whereas Ads Manager allows access to all available advertising objectives.
- Placement Control: Boost Post offers minimal control over where your ads appear, while Ads Manager lets you choose and manage placements in detail.
- A/B Testing: Boost Post does not support A/B testing, but Ads Manager allows you to test different ad variations to improve performance.
- Pixel Tracking:Boost Post does not include pixel tracking capabilities, whereas Ads Manager supports pixel tracking for measuring and optimising conversions.
- Campaign Structure : Boost Post does not use a structured campaign setup, while Ads Manager follows a Campaign → Ad Set → Ad structure for greater control.
- Budget Optimisation: Boost Post includes basic budget management, while Ads Manager offers advanced budget optimisation features.
Boosting is fine for simple post engagement. But if you're spending money to get leads or sales, Ads Manager gives you the control you actually need. The extra setup time is worth it once you see what the difference looks like.
How to Read the Ads Manager Dashboard
When you first log in, the dashboard shows a list of your campaigns with performance columns next to each one. You can customise which columns appear by clicking the "Columns" dropdown and choosing a preset like "Performance" or "Delivery."
The three tabs at the top let you switch between Campaigns, Ad Sets, and Ads. Click into any one to see the breakdown at that level. You can filter by date range using the calendar in the top right corner. If something looks off, check whether the date range covers a period when the ad was actually running.
Ads Manager also has a Breakdown tool that splits your results by age, gender, placement, or device. This is useful once you have enough data to spot patterns. You might find that most of your leads are coming from one placement but your budget is spread evenly across all of them.
Get More Out of Your Meta Ad Spend
Learning Ads Manager takes a bit of time upfront, but it gives you a clear picture of where your budget is going and who it's reaching. Most people who work through it properly start finding gaps they didn't know were there.
If you'd rather have someone set it up and manage it correctly from the start, the team at Karma Media works with service businesses across Australia on Facebook and Instagram ad campaigns. Get in touch to talk through what would work for your business.
.jpeg)
.jpg)